Getting started
To start working with the advertiser program you’ve been accepted for, you need ad media: display and mobile banners, links and script media, via which you can generate conversions for advertisers. You can access your ad media management directly via the navigation or via the icon in the program section.
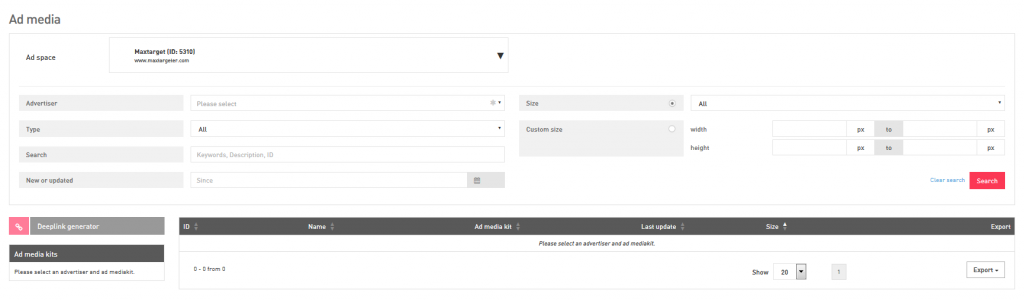
If you do so, a page will appear looking more or less like this:
Implementing ad media
Finding the right ad media item
As you can see, the page contains two main sections: a search panel and, below, the output of the search. To find the right ad media item, go through the following steps:
Select the ad space for which you want to implement ad media.
Select an advertiser.
Click on the button ‘search’ in the right lower corner of the panel.
If you want to narrow down your search further, you can use the following options:
You can search for a specific type of ad media: a banner, a link or an HTML-item.
You can use the search field to look for ad media with specific keywords, description or an ID.
You can look for new or recently updated ad media by selecting a date in entry ‘new or updated’.
You can search for a specific size: you can use the search option for standard sizes or look for a specific size using the custom option.
Use the ‘clear search’ button to restore the search panel values.
Ad media item properties
After you have hit the search button, one or more ad media kits will be displayed in the lower panel, on the left. The number of ad media items available in every kit will be displayed in brackets behind the name of the kit. To find your ad media item, click on the name. All the ad media in the kit will be displayed on the right. The whole lower panel will now look more or less like this:
.png?version=1&modificationDate=1588064414078&cacheVersion=1&api=v2)
Every entry represents one ad media item – you can see a preview in the column on the right. From left to right, you can find the following properties:
The ID of the ad media item.
The name of the ad media item.
The kit to which the ad media item belongs.
The date on which the item was updated lastly.
In case of banners, the side of the item.
A preview of the ad media item.
A tick box which allows you to select the ad media item and export it.
To export the ad media item, just hit the tick box and click on the button ‘export’ in the right lower corner at the bottom of the page. Please note you can select multiple items at the same time.
Tracking URLs
In the left lower corner of every ad media item panel, you will find the following menu options:
Click URL
URL options
Landing page
If you quickly want to get the tracking code related to the ad media item and integrate it in your content management system, just click on the option ‘click URL’. The click URL you see now can be implemented immediately. It will make sure all the clicks you generate via this ad media item will be tracked and traffic will be properly redirected to the website of the advertiser. For more information about the click URL, see the paragraph below.
Under ‘URL options’ you will find the following:
An option to add parameters to the click URL, the so called sub IDs. To find out more information about sub IDs, please read this article.
A button which allows you to display the tracking URLs as HTML codes, so you can implement the complete ad media item directly in the source code of your ad space. In case you are dealing with an HTML ad media item, you will find the code you need here.
The ad impression URL of the ad media item, which makes sure ad impressions (also known as ‘views’) are tracked and the ad media item can be displayed on your ad space. For more details, please see the paragraph below.
The click URL of the ad media item, which makes sure clicks are tracked and traffic is properly redirected to the website of the advertiser. For more details, please see the paragraph below.
The SEO-friendly version of the click URL. For more information on SEO-friendly tracking, please read this article.
Ad impression URL explained
The ad impression URL of most ad media items will look more or less like this:
http://trackingdomain.com/ts/i123456789/tsv?amc=dis.platform.1234.56789.012345&smc1=501
Let’s go through all the elements of the URL:
The ‘http://’ part indicates the protocol of the URL.
The ‘trackingcomain.com’ is the tracking domain used for the advertiser to which the ad media item belongs. If this domain corresponds with the domain of the advertiser, first party tracking is applied.
The ‘ts’ element makes sure the tracking application is activated.
The ‘i123456789’ is the tracking ID of the advertiser.
The ‘tsv’ element indicates that this tracking code is used to track ad impressions.
What follows are at least two parameters:
The ‘amc’ parameter is the ad media code, used to identify traffic. It contains the following codes:
The ‘dis’ code indicates the tracking channel. In this case, it is the display channel. Other examples of channels are retargeting, ad networks or organic search.
The ‘platform’ code indicates the platform to which the ad media item belongs.
The first numerical code identifies you as a partner of the platform. You will find that this code corresponds with the code you can find in your partner account.
The second numerical code indentifies the ad space for which you can use this ad impression URL.
The third numerical code identifies the ad media item to which the ad impression URL belongs.
Click URL explained
The click URL of most ad media items will look more or less like this:
http://trackingdomain.com/ts/i123456789/tsc?amc=dis.platform.1234.56789.012345&smc1=501
Let’s go through all the elements of the URL:
The ‘http://’ part indicates the protocol of the URL.
The ‘trackingdomain.com’ is the tracking domain used for the advertiser to which the ad media item belongs. If this domain corresponds with the domain of the advertiser, first party tracking is applied.
The ‘ts’ element makes sure the tracking application is activated.
The ‘i123456789’ is the tracking ID of the advertiser.
The ‘tsc’ element indicates that this tracking code is used to track clicks.
What follows are at least two parameters:
The ‘amc’ parameter is the ad media code, used to identify traffic. It contains the following codes:
The ‘dis’ code indicates the tracking channel. In this case, it is the display channel. Other examples of channels are retargeting, ad networks or organic search.
The ‘platform’ code indicates the name of the platform to which the ad media item belongs.
The first numerical code identifies you as a partner of the platform. You will find that this code corresponds with the code you can find in your partner account.
The second numerical code identifies the ad space for which you can use this click URL.
The third numerical code identifies the ad media item to which the click URL belongs.
IAB Transparency and Consent Framework (TCFv2.0) related
If the platform has enabled the IAB Transparency and Consent Framework (TCFv2.0) and you also activated TCFv2.0 for the ad space like described here, the URL will contain following TCFv2.0 macros:
gdpr=${GDPR} and gdpr_consent=${GDPR_CONSENT_XXXX}You must populate t data received from your Consent Management Platform (CMP). For more information about TCFv2.0 click here.
What’s next?
Now that you are able to find your advertiser programs and ad media, let’s have a look at the reporting section.