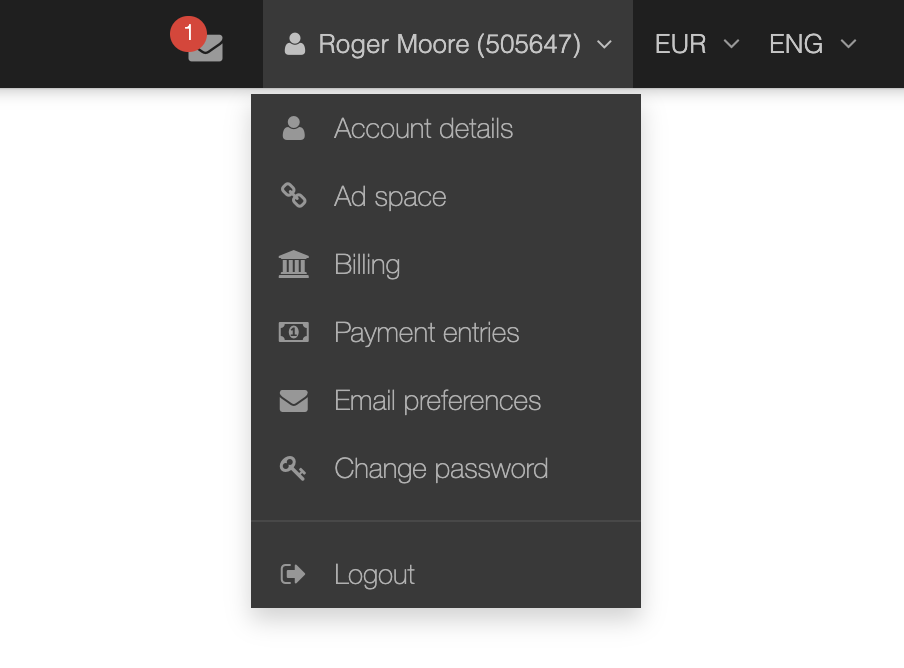
To manage the settings of your account, go to the right corner of the top bar of your partner UI. If you scroll over the name you registered and your user ID, you will see a menu looking more or less like this:

All you need to do now is choose what section you would like to edit and click on the name. The various sections are discusses in more detail below.
Under ‘account details’, you can manage your personal data (name, address, contact details, etc.). Furthermore, you are able to define the following settings of your partner UI:
The payout limit allows you to define a minimum amount of commission you need to generate before a payment entry is created. Please note not all platforms allow you to set the payout limit to zero.
In the ‘newsletter’ section, you can define whether you want to receive newsletters from the platform and the advertisers you have been accepted for. You can also define whether these newsletters should be send to your email, to the inbox of your partner account, or to both.
Please don’t forget to hit ‘save’ in the lower right corner every time you change something in the basic details.
If you click on ‘ad space’, a page will appear with an overview of all the ad spaces you have registered in your account.The ad space is the space in which you will implement the ad media of the advertiser you will be generating business for. In most cases, this will be a website, but it can also be a mobile app or a newsletter.
For comprehensive instructions on how to manage your ad spaces, please follow the instructions in this article.
Under ‘billing’, you can check and edit the data required for your payment. Please note only the fields marked with an asterisk (*) are mandatory. Let’s go trough all the fields on by one:
Under type, you define whether you are liable to value-added tax (VAT) or not. Please note the option self employed is only relevant when you are located in Spain.
Under country, you need to select in what country your bank account is registered.
Under account holder, you need to fill in the name of the person holding the bank account you are about to register. Please note this can also be the name of your company.
If you have filled out you are liable to VAT, you will find you will have to fill in your VAT identification number. If you are not liable to VAT, you can fill out a regular tax identification number here.
Under tax office, you can fill in the name of the tax office where you are registered. Please note this field is only mandatory when you are liable to VAT.
Under bank account number/IBAN, you need to fill in your bank account number or IBAN. The IBAN is an internationally agreed system of identifying bank accounts across national borders. It is relevant when your bank account is located in a European country, Bahrain, Costa Rica, the Dominican Republic, Georgia, Guatemala, Israel, Jordan, Kazakhstan, Kuwait, Lebanon, Mauritania, Mauritius, Pakistan, Palestine, Qatar, Saudi Arabia, Tunisia, the United Arab Emirates, the British Virgin Islands. In some cases, it might also be relevant when your bank account is located in Algeria, Angola, Benin, Burkina Faso, Burundi, Cameroon, Cape Verde, Iran, Ivory Coast, Madagascar, Mali, Mozambique, Senegal and the Ukraine.
Under SWIFT/BIC, you need to fill in the SWIFT or the BIC of your bank account. Both are IOS 9362 codes aimed at identifying your bank across national borders. In most countries, the SWIFT code is used; in European countries, the BIC is more common.
After you have filled in the fields, you need to confirm the information on your VAT liability and the correctness of the details you filled in. Don’t forget to click on save when you are ready.
Under payments, you can find an overview of all the payment entries created for you. To find out more about payment entries, please read the article on the financial process.
This page allows you to change your password easily. All you have to do is enter your new password, repeat it below and hit the save button in the right lower corner of the panel.
Now that the main settings of your UI are done for, let’s see how you can apply for programs.