Login your admin UI, click on ‘partner’ in the main navigation menu and proceed to click on ‘manage partner’. Use the filter panel to find the partner you want to edit. For comprehensive instructions on the filter panel, please read this article.
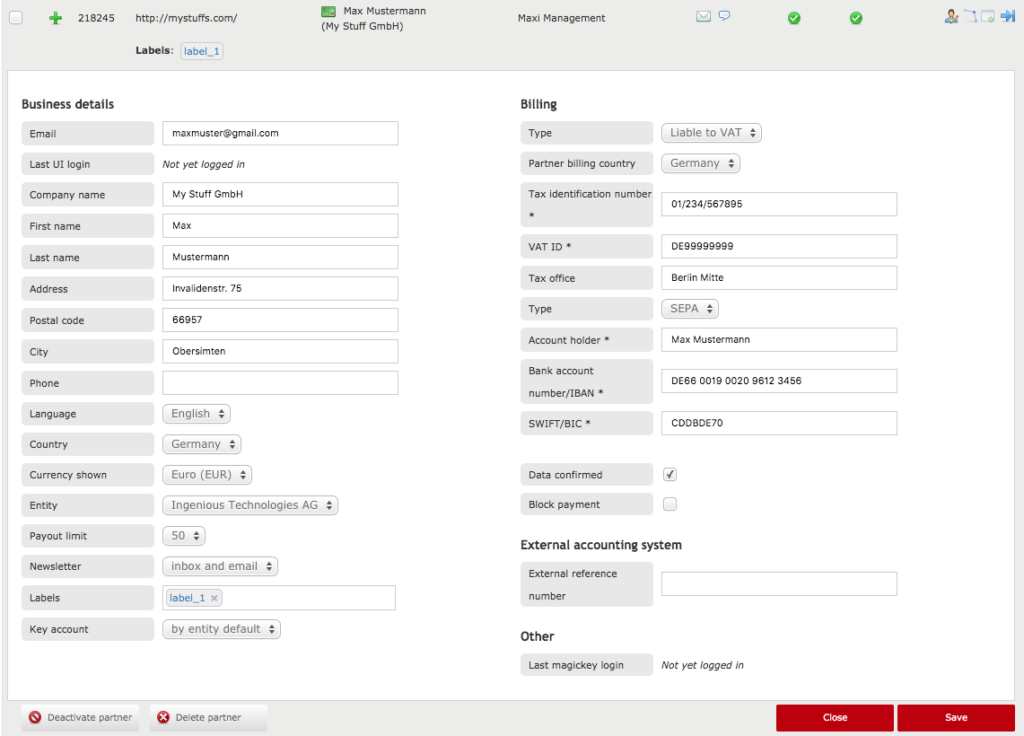
Scroll down the page and go to the partner you want to edit. If you click on the icon on the right, you will see a panel opening up looking more or less like this:

In the column on the left, you will find all the basic details a partner has registered:
First, you will find the partner’s email address. This email address is also functioning as the partner’s username for the partner UI. It can be changed, but please make sure you inform your partner if you do so.
The last login entry informs you on the time and date on which the partner logged into the partner UI for the last time.
Below the title, you will find the partner’s first and last name, the address, the postal code, the city, the phone number and possibly a fax number.
The language indicates what language partners registered upon registration. Please note they might have changed it in the meantime.
The country represents the country from which partners are operating their business.
The currency shown is the currency in which figures in the partner UI are displayed. If these figures do not correspond with the currency of the advertiser program, they will be converted. For more information, please read this article.
The entity is the legal body responsible for the payment of the partner.
The payout limit is the minimum amount of commission a partner has to generate before a payment entry can be created.
The newsletter setting defines whether a partner receives system emails and your newsletters via the email address registered, via the inbox in the partner UI, or both.
You can give your partners labels to make sure you can find them easier.
You can assign a key account for your partners. Every platform user with the type “Platform” is displayed as a key account option here. This key account can also be set on entity level (‘by entity default’ will then be displayed here).
In the column on the right, you can see the billing data. Please not that the entries displayed in this section depend on the billing type and the billing country selected. Let’s go through the entries and most commonly used options one by one:
The billing type defines whether a partner is liable to VAT or not.
The billing country defines in what country the partner is registered and is obliged to pay taxes.
The tax identification number is the number via which the taxation authority identifies the partner.
The VAT ID is the ID via which the taxation authority identifies the VAT paid by the partner.
The tax office entry displays the name of the taxation authority’s office which holds the account of the partner. Please note this is not a mandatory field.
The ‘type’ defines the payout process for the partner. There are three different types:
The SEPA is relevant for partners who have bank accounts registered in the Eurozone and can provide an IBAN and a BIC.
The IBAN is relevant for partners who have bank accounts registered in countries that have adopted a payment system according to ISO 13616. This does not only include European countries, but a most of the countries in the Caribbean and the Middle East as well. Partners with this type need to provide an IBAN and a SWIFT code.
The SWIFT is relevant for partners who have bank accounts registered in countries that did not adopt a payment system according to ISO 13616. Partner with this type need to provide a bank account number and a SWIFT code.
The account holder represents the owner of the bank account the partner has registered. Please note it might differ from the
Below the account holder, the partner’s bank account number or the IBAN will be displayed. Below this entry, you will find the SWIFT or BIC code.
When the box data confirmed is ticked, the partner has confirmed the billing data via the partner UI.
You can tick the box block payments to make sure no payment entries can be created for the partner anymore. This option can be used when the partner is not receiving any commission, or when the billing data turns out to be invalid.
Finally, you can add a reference number which allows you to identify the partner in an external accounting system. If you enter this number, it will appear on all the financial documents related to this partner.
At the bottom of the right column, there is some additional data related to the partner:
You can find out when the partner logged in for the last time using the API key.
You are free to edit all the data and settings in the panel discussed above. Please be aware that any changes here will directly affect the UI of the partner. When you are done editing, don’t forget to click on ‘save’ in the right lower corner of the page. Use the ‘cancel’ button to discard your adjustments.