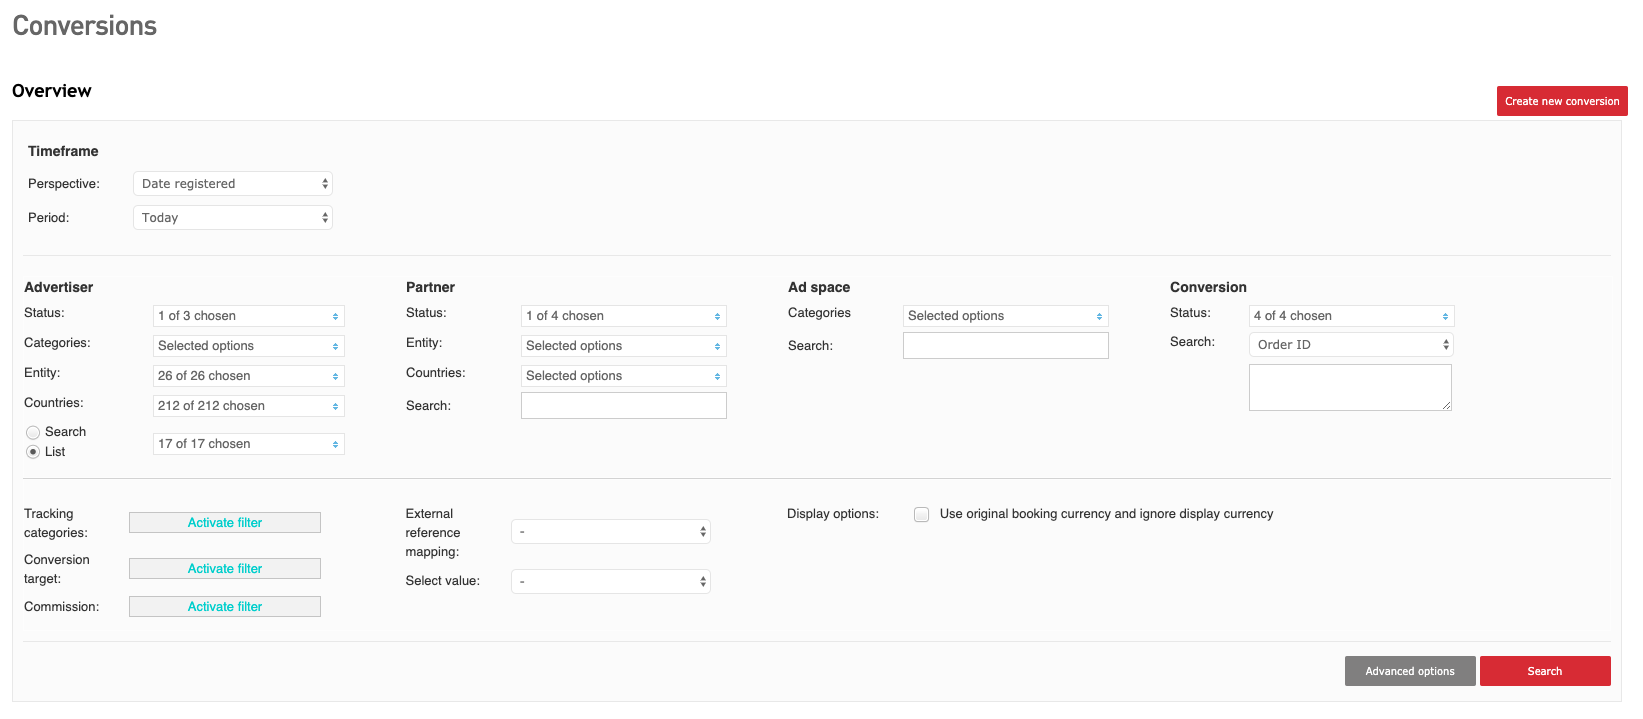
Make sure you are logged in to your admin UI, click on ‘finance’ in the main navigation menu and proceed to click on ‘conversions’. You will be taken to page on which you can manage conversions. This page consists of two panels: a filter panel and second an overview of conversions displaying the conversions that match your filter settings.
The filter panel will look more or less like this:

As you can see, the filter panel contains the following options:
In the first part, you can filter conversions by setting a specific timeframe. Here you can choose the time period by so called “perspective” option, which allows you to display the conversions by the moment they were originally registered, by the date on which they were updated, i.e. validated or included in a payment entry. By default, the moment of the initial registration will be selected.
In the second part you can filter conversions by the properties of advertiser, partner, ad space as well as search for the specific conversions and their status:
In the first column you can filter the conversions by advertiser, as well as by advertiser properties like status, entity, categories and country. Points to note are:
When you want to filter per advertisers, you can choose to display the advertisers in a list or use the filter as a search function. The last option is useful when you have a lot of advertisers on your platform.
In the second column, you can filter conversions by partner, as well as by partner properties like status, entity and country. A point to note is:
The “country” is the country in which the bank account of the company is registered.
In the third column, you can filter conversions by ad space as well as by ad space categories.
In the fourth column, you can find the filter by conversion properties:
You can filter by the four different statuses a conversion can have: open, approved, rejected and confirmed.
For more information on the status of conversions, please read the section on validation in the introduction to finance issues.
You also can look for several IDs related to the conversion:
The order ID, i.e. the ID that was used by the advertiser to identify the conversion during the purchase on its website.
The PID, i.e. the ID of the ad space via which the conversion was generated.
The sub ID the partner was using to identify the conversion.
The touchpoint ID, i.e. a unique value for every touch point generated via the ad media.
The voucher code that was used during the conversion.
To filter by these IDs, select the ID you want to use and fill out the ID in the search box below.
Please note that there is also a button for advanced filter options. Here you can find the following filters:
The tracking category of the conversion. Please note that if “basket tracking” has been applied to the advertiser, the product category of the conversion will always be ‘basket’.
Conversion target filter allows you to look at conversions made by new and recurring clients only, leads, app installs, etc. For more information on conversion targets, please read this article.
The commission model of the conversion.
You can use the external reference mapping filter to relate conversions to references from an external system, as long as they are registered in the external reference mapping feature.
The display options allow you to display the original booking currency, i.e. the currency used for the conversion. This comes in handy when you work with multiple currencies.
When you have set the filter options you need, hit the button ‘search’ in the right lower corner of the panel. A new list with conversions matching your criteria will be generated immediately. Please note that in most cases, not all conversions will be displayed on one page. In the bottom left corner of the conversion list, you will see how many of the total number of conversions are displayed on the page. To change the number of conversions displayed on one page, change the number in the menu next to ‘show’.
Default filter settings
If you do not modify the filter settings and go through the list immediately, the list will contain all conversions generated today for all active advertisers by all active partners on your platform.